Okay, can we just take a moment to appreciate how amazing the latest Hoop Studio creation is? They’ve taken our SEI Velvet Paper and worked some magic with machine embroidery to create a stunning raspberry shaker card—and it’s absolutely gorgeous!


Okay, can we just take a moment to appreciate how amazing the latest Hoop Studio creation is? They’ve taken our SEI Velvet Paper and worked some magic with machine embroidery to create a stunning raspberry shaker card—and it’s absolutely gorgeous!
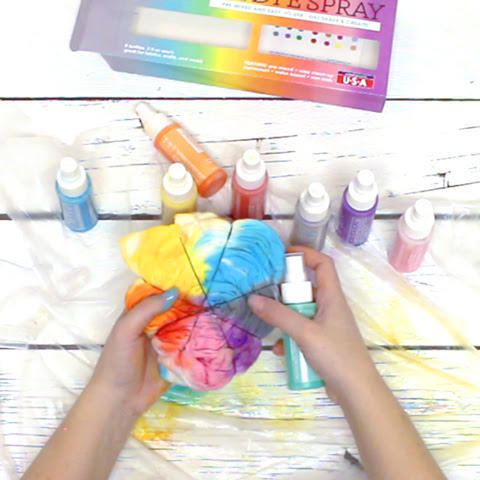
Happy Valentine's Day! We are so excited to share this cool marbled t-shirt project with you today. We decided to use SEI Tie Dye in shades of red for this shirt and use a heart cut-out.


We are so happy with how it turned out. Want to make your own? This video shows you step-by-step how we did ours.
Do you like hearts? What shape would you use for a shirt like this? There are so many great options!
Do you like to wear special shirts for holidays? Today we have a Valentine's shirt that's not cheesy at all. In fact, it's super classy. If you want to make your own, all you need is a t-shirt, iron-on letters, iron, and a hard, flat surface to iron on.

It's time to start gearing up for the holidays! Yay! We love this time of year... family, parties, food. It's all good! We decided to kick off the holiday season by making a special holiday shirt.

What do you think? We love how it turned out! It was really easy to do. All you need is a plain white t-shirt, white flock iron-on letters and tie dye. Other supplies you'll want to have are plastic to protect your surface (we used a garbage bag), iron, and hard-flat surface. This video shows the whole process...


Halloween is less than a week away! We hope you're ready!

Here's a cute little Halloween onesie we made with our tie dye and iron-ons.

Wouldn't this be cute to do as a matching family set? What text would you put on a Halloween shirt?
We realized we hadn't created a video of using our galaxy tie dye kit. So, we made one for you! We are pretty happy with how the shirt turned out. It was super easy to do!

You can watch how we did it in the video below. We also want to share a few tips that will help you get the best results.
First off, make sure to keep some white space so your design doesn't become too muddy. The white space represents the starry areas of the galaxy. For our example, we used small pieces of paper towel balled up. Another thing we have used to mask off some white areas is rock salt (like you buy for making homemade ice cream).

Our second tip is to group the similar colors together. Spray the pinks and purple together in a group. Spray the blues and turquoise in a grouping. Then, go easy on the black intermixed throughout.
The last tip is to spray the glow-in-the-dark spray last, focusing on the lighter areas. The glow will show up best in the white and lighter areas.
We hope these tips help you create an amazing galaxy project!
Have you ever used velvet paper? If not, give it a try! It's really popular for weddings. One of our clients shared this lovely wedding menu with gold embossing.


Here's a little video we put together with even more ideas. Enjoy!
We thought it would be fun to see what happens if you freeze SEI tie dye and let it melt on a damp shirt. Lucky for us our tie dye is water-based. So, this little experiment was possible.

We think the results are pretty cool. It reminds us of one of those neat speckled eggs. Perfect for springtime!

We froze the dye in ice trays and placed it on a scrunched up damp shirt. After the dye melted into the shirt, we scrunched it some more to create this effect.

Then, we air dried it flat and ironed it to make it permanent.

That's it! What do you think? Would you like to try some tie dye experiements?
We are so excited to make projects with our new tie dye kits! So, here are a couple of t-shirts we made with the cotton candy and playful pastel kits.

If you don't want a lot of white space, make sure to spray a little dye into the folds. We loved how it turned out!


What do you think of these new kits? What would you make with these colors?
I found these cute little canvas shoes. But, noticed they had a stain. So, I decided to dye them to cover up it up. I just used the primary 3-pack and allowed the colors to blend. What do you think?

The primary 3-pack and classic 8-pack are on sale this week for 20% off. They make great gifts!
We designed these adorable foam puzzles a while ago. So, I was surprised to realize they match my kids' rooms perfectly!


My son loves outer space right now. He knows a lot of random facts about our solar system. So, we recently redecorated his room in a space theme.
He was excited to put together this foam puzzle. I sat by him and helped remove the stickers. He did a great job!


This design includes her favorite colors. It will look adorable in her room.
I don't know about your kids. But, at least one of mine always wants an obscure Halloween costume. So, I end up putting something together myself rather than buying one. One of my favorite supplies to use for these homemade Halloween costumes is our full iron-on sheets.

You can cut out any shape you want and iron it onto a shirt, pants, trick-or-treat bag or whatever you need to complete the look.

This glow-in-the dark sheet is one of my favorite for Halloween. It's white in the light and glows kind of a neon green color in the dark.
However, you don't have to use iron-on sheets just for Halloween. They work great for everyday outfits too, like the arrow shirt we made by cutting a white iron-on sheet into strips and triangles.

With the holidays coming, you may be starting to think about how to make your gifts more meaningful, handmade and personalized, like this cute little trinket bag.

You could also make a custom apron for the holidays as a gift or for yourself. These are a couple of aprons we decorated with iron-on sheets.

What do you think? Do you have a use for iron-on sheets? They are on sale for 20% off this week!

It's still hot here in Utah. But, before long we will start diving into fall and Halloween! So, we thought we would kick start this season with a simple Halloween project using our jack-o-lantern iron-ons.

We started by ironing the largest jack-o-lantern onto the shirt. Then, we added glow-in-the dark letters. These letters have to be removed very carefully.

This sheet also includes 2 little jack-o-lantern iron-ons. So, we decided to make a little bib too. For this one, we used our black classic iron on letters.

Do you like to dress up for Halloween? If you do, you're in luck! Our Halloween iron-ons are on sale this week. Check them out here.
There is something special about handwritten recipes. We cherish recipes in mom and grandma's handwriting. So, we love using our recipe book kits to make thoughtful gifts for weddings, college students and Christmas.


You can title your recipe book whatever you'd like or use this first page to write a special note to the recipient. You can see we also used some of the stickers to label the different sections

Here's one of the recipe cards. Aren't they pretty? HINT: These books are on sale this week 2 for the price of one!
Our neon tie dye kits are so vibrant and fun! Also, they are on SALE this week. 😀 So, we decided to make some tie dye shoes.

These were a lot of fun to make! All you need is some plain white canvas shoes. We picked these up at Walmart for about $13.

We lightly sprayed the shoes with water to help the colors blend. Then, painted on the dye. After we let them air dry, we heat set with a dryer and iron. To make them last even longer, we let them dry on a very hot day in the sun and sprayed them with shoe waterproofer.

What do you think? Would you wear them?
This week our kids and baby iron-ons are on sale! Here's a back-to-school shirt we made with one of them. These are so simple to use.

Simply place them with the adhesive side touching your shirt, paper side up. Press with an iron. Then, let it cool for a minute and peel off the backing. I also like to turn my shirt inside out and iron the other side to make sure it's adhered well.
Done! How is your back-to-school shopping going?
We're starting our back-to-school shopping. It's interesting how sometimes kids want something very specific. That was the case with this 2-color tie dye shirt.

My daughter specifically requested a pink and blue spiral tie dye shirt. Unfortunately, there weren't any in the stores that were exactly what she wanted. Fortunately, I work at SEI and we sell tie dye. So, all I really needed was a white t-shirt.
We hope you're having fun back-to-school shopping. Are any other kids requesting tie dye this year?
Summer clothes are on clearance where we live. So, we snatched up these white shorts to use with our new playful pastel tie dye kit (which is on sale this week, BTW).


